Wednesday, 30 August 2017

How to draw , A beautiful landscape,cool morning - soft pastels


How to draw, a beautiful landscape, cool
morning - soft pastels


ABOUT PICTURE

I love to draw paintings for beginners. So
today I thought of drawing a painting of hill in desert in cool morning where I
drew many trees and made a bird of peace in the morning. In this kind of places
the time changes from morning to noon the place starts to be empty and dry. You
can’t see any animals then that are why I made bird to show the time to be
morning.


STEP 1: In this step I put sky blue color
and white for the sky and drew the shape of the hill with red. It is basically
desert area so I left some are blank in the lower of the hill. I will make
other things there.

STEP 2: Then after giving some white in the
sky I colored the hill for the first cote. At the right side of the hill I put light
brown and very little yellow ocher and blurred it. And as the light is coming
from the right side obviously the left side of the hill is dark because of the
shadow. So I colored it with blue and brown and blurred it. And in the lower
portion of the hill I used yellow ocher and at some places I used brown

STEP 3: And in this step I lighted the
right side of the peak of the hill with yellow ocher from the top to the bottom
but I only blurred the lower area. I didn’t blurred the peak because of the
light. And I also lighted the lower part of the hill with yellow ocher on the
areas where I put the brown color. It will show that the land is little high
low


STEP 4:
Now after that I drew some trees. One in the front and another is in the
little far. I here drew the stems with brown pastel pencil and I used little
yellow ocher for the light. And I blurred in little area because if I blurred
all the way up to the down it may make the painting bad. In this area this
types of trees are found.


STEP 5: Then I drew another tree stem which
I want to show its Broken so I drew it half with same color combination. But
don’t forget to add light and shadow. On this tree I drew a bird sitting there
with pastel pencil.

STEP 6: Here I added some more very small
trees with brown and added light. So now you have a proper painting of hill in
desert.

Tuesday, 29 August 2017

How to use soft pastels on paper , A Large Waterfall - soft pastel


How to use soft pastels on paper, A Large Waterfall - soft pastel

ABOUT PICTURE

As I travel a lot I see water falls in many places. But I wanted to makea large waterfall falling in steps. It is difficult for beginners for that I wanted make it easy for students. I hope you will enjoy this drawing. You can follow the few easy steps below

Step 1: Here I am using a black sheet because I have to use many lighting in waterfalls and light takes very bright look mostly on the dark. So as the base I put sky and pink color and blurred it.

Saturday, 26 August 2017

Monday, 21 August 2017

drawing pink flamingos birds , landscape - acrylic paintings


Drawing pink flamingos birds, landscape - acrylic paintings


ABOUT PICTURE

Hi, I am Dilip Sarkar. Here is a painting of flamingo’s birds. Sometime ideas come from various things. That day I was watching discovery channel and got to see a beautiful picture of these birds but I just added some variety in the pictures of my imagination and also for making it little simple for students. So I drew it as easy as possible for you. Because I am not here just to show you what I know about art I want to let you know how to draw beautiful paintings with very easy processes. I hope you all enjoy it. Here is some simple steps.

Acrylic Colors - Here I use types of colors such as White, Yellow Ocher, Orange, Red, Prussian blue, Black & burnt sienna,

I use some different types of brushes like flat brush no. 4, 8, 12; fan brush no. 4, flat brush 2” and spatula knife.


HOW TO DRAW STEP BY STEP ACRYLIC PAINTING

STEP 1: First of all I want to tell about why I used black canvas. Black In the sense I colored black in all the canvas with black acrylic color. Because in this painting there is many compilations about darks and light such as the dark jungle area behind the flamingos bird, the lake, many other things like that.

How to Draw - 3D Cube step by step - Pencil Shading


HOW TO DRAW - 3D CUBE STEP BY STEP - PENCIL SHADING

Hi friends, as I always say sketching are very important for drawing. You can follow my tips to improve your sketching skill.

So here are some tips how to sketch 3D cubes, how to draw and shade.

Tools: Type of pencil-HB,2B,4B,6B and ruler.

It is very easy to make a cube if you know the right steps. So draw a square and give a point in the center of the square. Then draw another square of which the vertex is the center of the first square. Join respective corners to get the cubic shape. To make it a proper cube erase the inner lines of the first square and also erase the inner line of the right plane of the cube.

STEP 1: If you are very beginner then I recommend using ruler for drawing a cube. First draw a two perpendicular line, then draw four vertical lines parallel to the perpendicular (first should be 1/2 inch from the perpendicular). Then draw four lines 1 inch from the horizontal and draw 10 boxes. Then give a point half inch from the box. And then use same method in the side box of exact lower step then same as other steps till the end. Then add all the points. Then you will get the cubic shape just erase the extra lines left here. Then finally correct and draw the outlines.

Very carefully follow the step 1. It is very important step. Carefully follow the recommended measurement.

STEP 2: Then let us consider light coming from left side. Then lightly shade the left side of the cubes. Then deeply shade the right part of the column of cubes. Then you will get the proper 3D cubes.

Thursday, 17 August 2017

How to draw with oil pastels for beginners, a realistic 3D apple step by...


How to draw with oil pastels for beginners, a realistic 3D apple step by step - Oil pastels


Hi friends, painting are not just about putting colors on pictures. It is also about how you make it realistic. That’s my goal for this channel.

Like photography, we can use painting to remember things. Long ago, where there was no camera this is what artist did. Realistic painting is not so easy. If you start learning steps and visualizing a picture very clearly it will be little easy for you .

Here is beginning tips on how to make a realistic 3d apple.

TOOLS: Pencil,oil pastel

STEP 1: First draw a outline of apple. Remember apples in natural don’t come in round shape, so start drawing it by an oval shape and then you can easily draw a proper outline of an apple as I drew it the video.

How to Draw a Realistic Eye step by step , watercolor


HOW TO DRAW A REALISTIC EYE STEP BY STEP, WATERCOLOR

Hi friends, today I am going to show how to draw a realistic eye. I see many people drawing a face but they don’t concentrate in detailing of the eye. So this is the purpose of this drawing. I want to show you how you can give more details in eyes in your drawing. It will make your drawing more realistic. Follow my drawing tips to develop your drawing skill.

Drawing Tool: Here I used Curtis paper, four colors such as Prussian blue, burnt sienna, carmine red, yellow ochre.

Brushes ‘0’, ’2’,’6’,’12’.

STEP 1: First start from making a outline of a eye as I showed in the video. You can use a glass or something like that by which you can draw a perfect eye ball. Also make sure that u have to give some detailing in eye ball. You should take care of these little things to make it realistic.

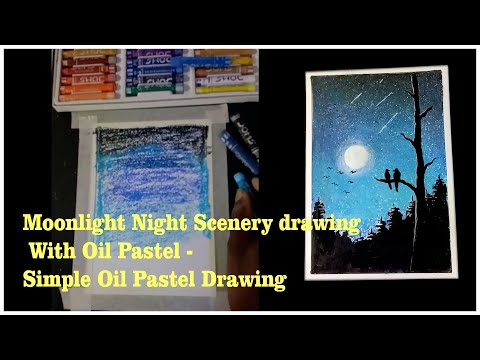
Moonlight Night Scenery drawing With Oil Pastel - Simple Oil Pastel Dra...

Moonlight Night Scenery drawing With Oil Pastel - Simple Oil Pastel Drawing | Dilip Art Hi friends I'm Dilip Sarkar I have tried to ma...